
Photo: Ron Ruscio
Landscape design/build work is a highly visual service. Customers often call to boost their curb appeal or create a wow factor in their backyards.
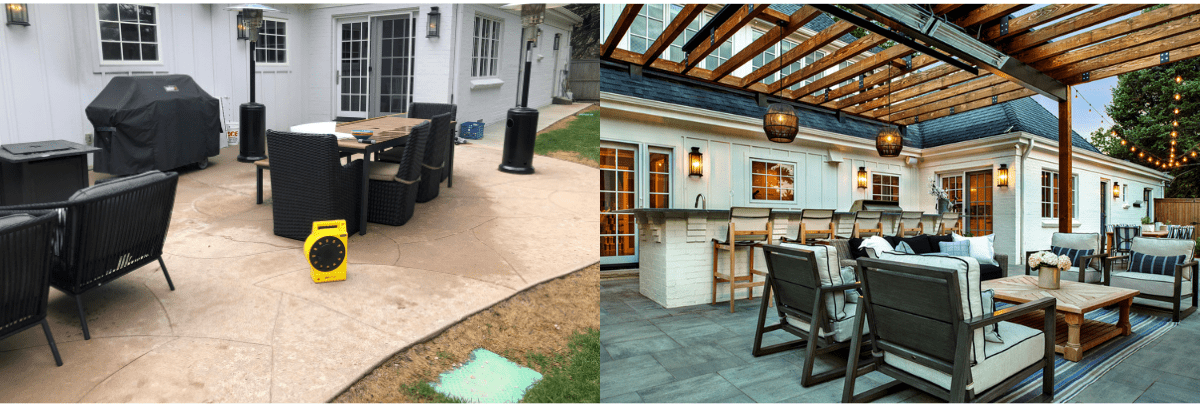
Because this service line creates such visually striking differences before and after a job, take advantage of the transformations you’re behind by documenting and marketing them.
The Benefits of Before-and-After Shots
The main reason before-and-after photos are influential is because they provide immediate, tangible evidence of the change your landscape company can make. It can also foster credibility for your firm as it demonstrates the expertise and results your team can craft.
Before-and-after pictures are also an effective tool for your online and offline marketing. The power of imagery cannot be overstated. Studies have shown that compared to a 10% retention of written content, 65% of visual content is remembered three days later.
Consumers also spend more time viewing content with images. As leads are exploring your company website, having a section for before-and-after photos is ideal. You can also turn these into case studies, where you can go into more detail about the projects. While a picture is worth a thousand words, sometimes context can really drive home the point of what a lead is looking at and what your landscape company was able to achieve.
Creating Compelling Before-and-After Photos
You’re probably aware before-and-after images are persuasive, but you may lack a clear process that ensures you are collecting these types of pictures or doing it in an organized manner.
Build out a plan that determines who will be involved with documenting your before-and-after shots. Consider what projects you want photographed and when are the best months to have them photographed. Some projects may require a few years before they reach maturity and look their best.
When selecting which projects you want to document, consider the jobs that were the most creative or highlight specific specialties your business is known for like custom hardscape features.
While it’s easier to remember to take pictures once the job is done, you need those preliminary shots when the property has yet to receive its makeover. They help reinforce the level of transformation you were able to achieve. Delegate who is responsible for capturing these pictures and make sure they are taking pictures of the same angles you’ll want of the finished project.
Also, make sure you have a defined way of organizing your before-and-after photos, as they will do you no good if you can’t find them later for your website and marketing efforts.
It is highly recommended that you hire a professional photographer to capture your finished landscape projects. Look for one who specializes in taking the kind of shots you want and check with their references to ensure you’re going to be satisfied with the experience.
Photo Faux Pas
If you cannot afford a professional photographer, the next best thing is to invest in a DSLR camera and tripod. However, if you know deep down a professional camera is going to be left in the office regularly, skip this expense and start taking advantage of your smartphone’s camera, if you have the latest model.
Some common mistakes when taking your own after shots are blurry images and pictures that are too close and don’t convey the scope of work. When taking the after photos, use the before images as a reference so you’re getting the same viewpoints.
Another overlooked consideration is the timing. While you may assume a sunny day is the best time to take pictures, the bright light can make images overexposed while other sections are in dark shadows. Try to take pictures on overcast days instead. Also, if you’re trying to capture landscaping lighting projects, wait until dusk to take these pictures.
It’s also critical to coordinate with your customers, whether you are taking the pictures or a professional is. First, have them sign a release form consenting that you can use pictures of their property for marketing materials. Then, work with them on timing and ensuring the site is looking its very best with patio furniture or other decorative additions.
You’ll also want to make sure things like grill covers, toys, weeds, dying plants and any other eyesores are removed in advance of the photoshoot.
Lastly, if you’re going the DIY route, don’t forget to enhance the image with some simple editing software. Making small tweaks can help the images pop by increasing the vibrancy and adjusting the contrast.